View specifications
Specifications overview
The Specifications page shows all projects and their specifications. On the top right corner, users are able to switch view from blocks view to list view, do a quick search for specifications using the search bar, and export all projects and specifications to a DCAT-AP format.
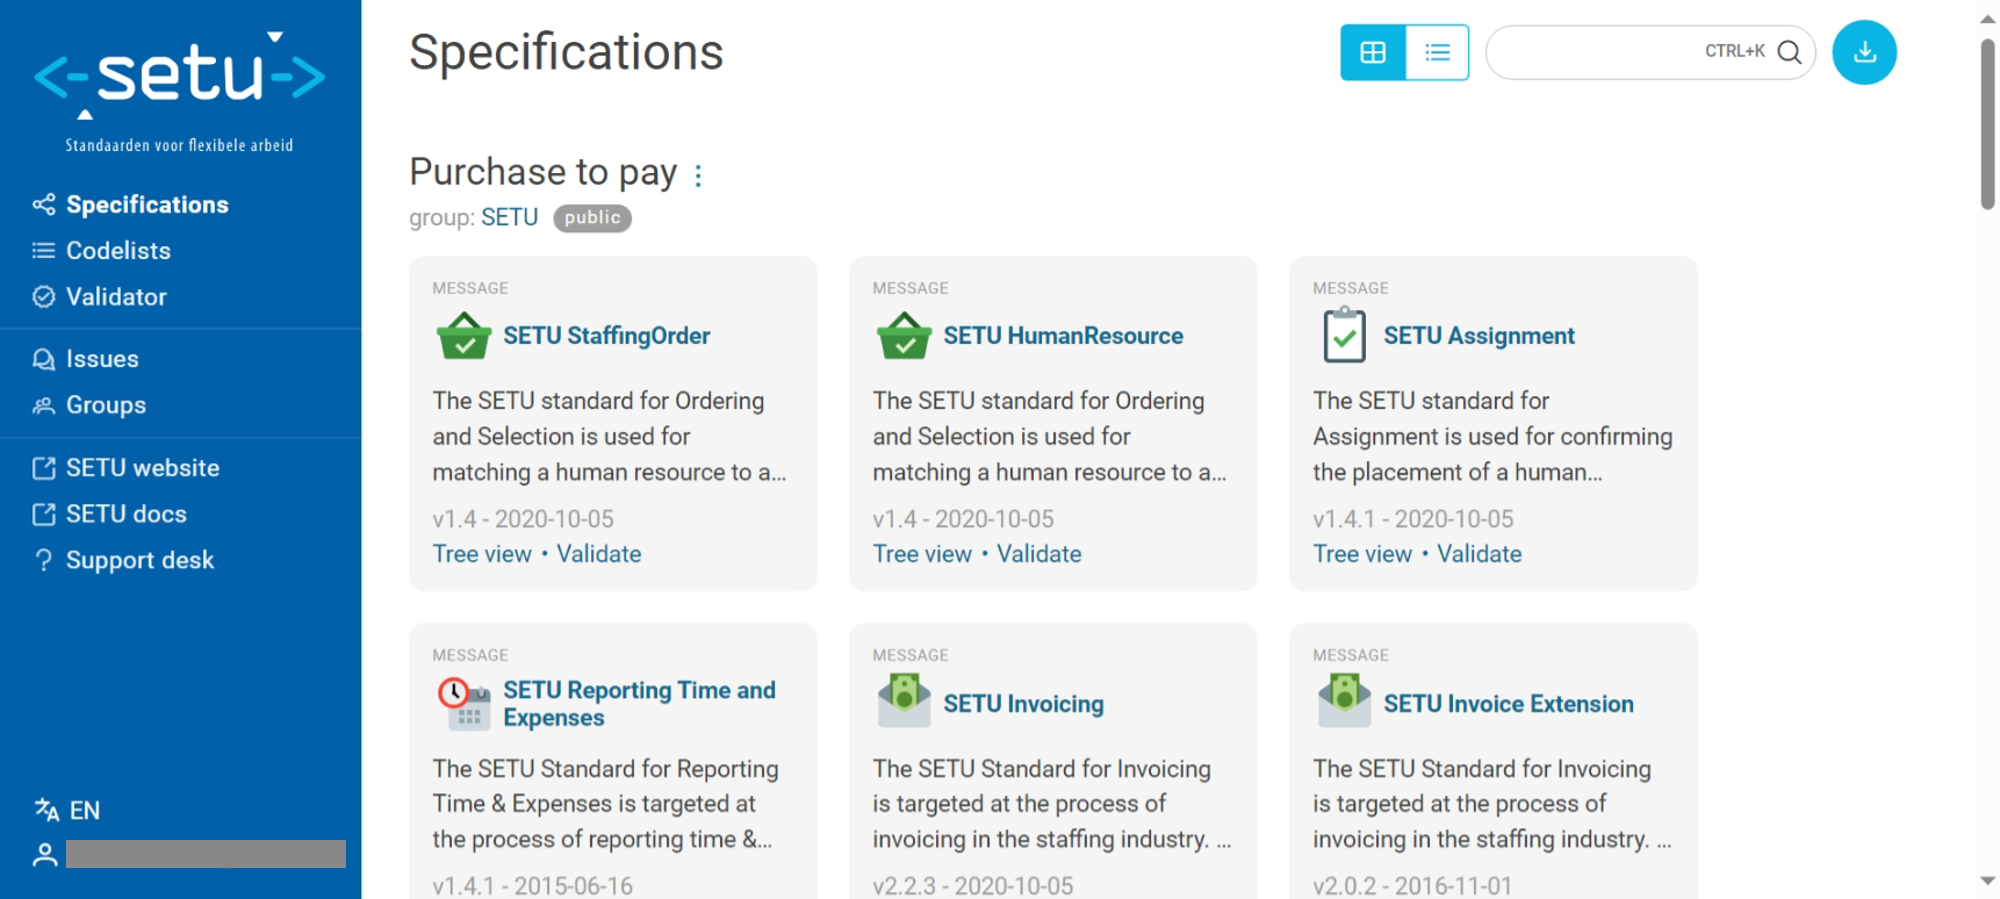
All specifications are divided into Projects. The name of the project is shown on top together with Group to which this project belongs and 'public' tag. By default all projects have a 'public' tag indicating the project is visible to all users. Projects that should not be publicly visible can be allocated to a certain Group and therefore do not have a 'public' tag.
Projects contain grey blocks with specifications. Each specification block consists of some basic information:
- The type of specification is indicated in the top left corner. A commonly used type of specification is a message model, but other types are ontologies, taxonomies, technical standards and external specifications.
- The name of the specification. This title can be clicked to guide to the specification.
- A short preview description of the scope of the specification.
- The latest version and corresponding publication date.
- A quicklink to the tree view and validator of this latest version.
From now on, this documentation page uses a message model as example specification to further eloborate on the functionality of viewing specifications in Semantic Treehouse. The other type of specifications (ontologies, technical standards, etc.) share all or most functionalities and therefore using a message model specification as example throughout this documentation page will suffice to show all functionality.
Message model overview
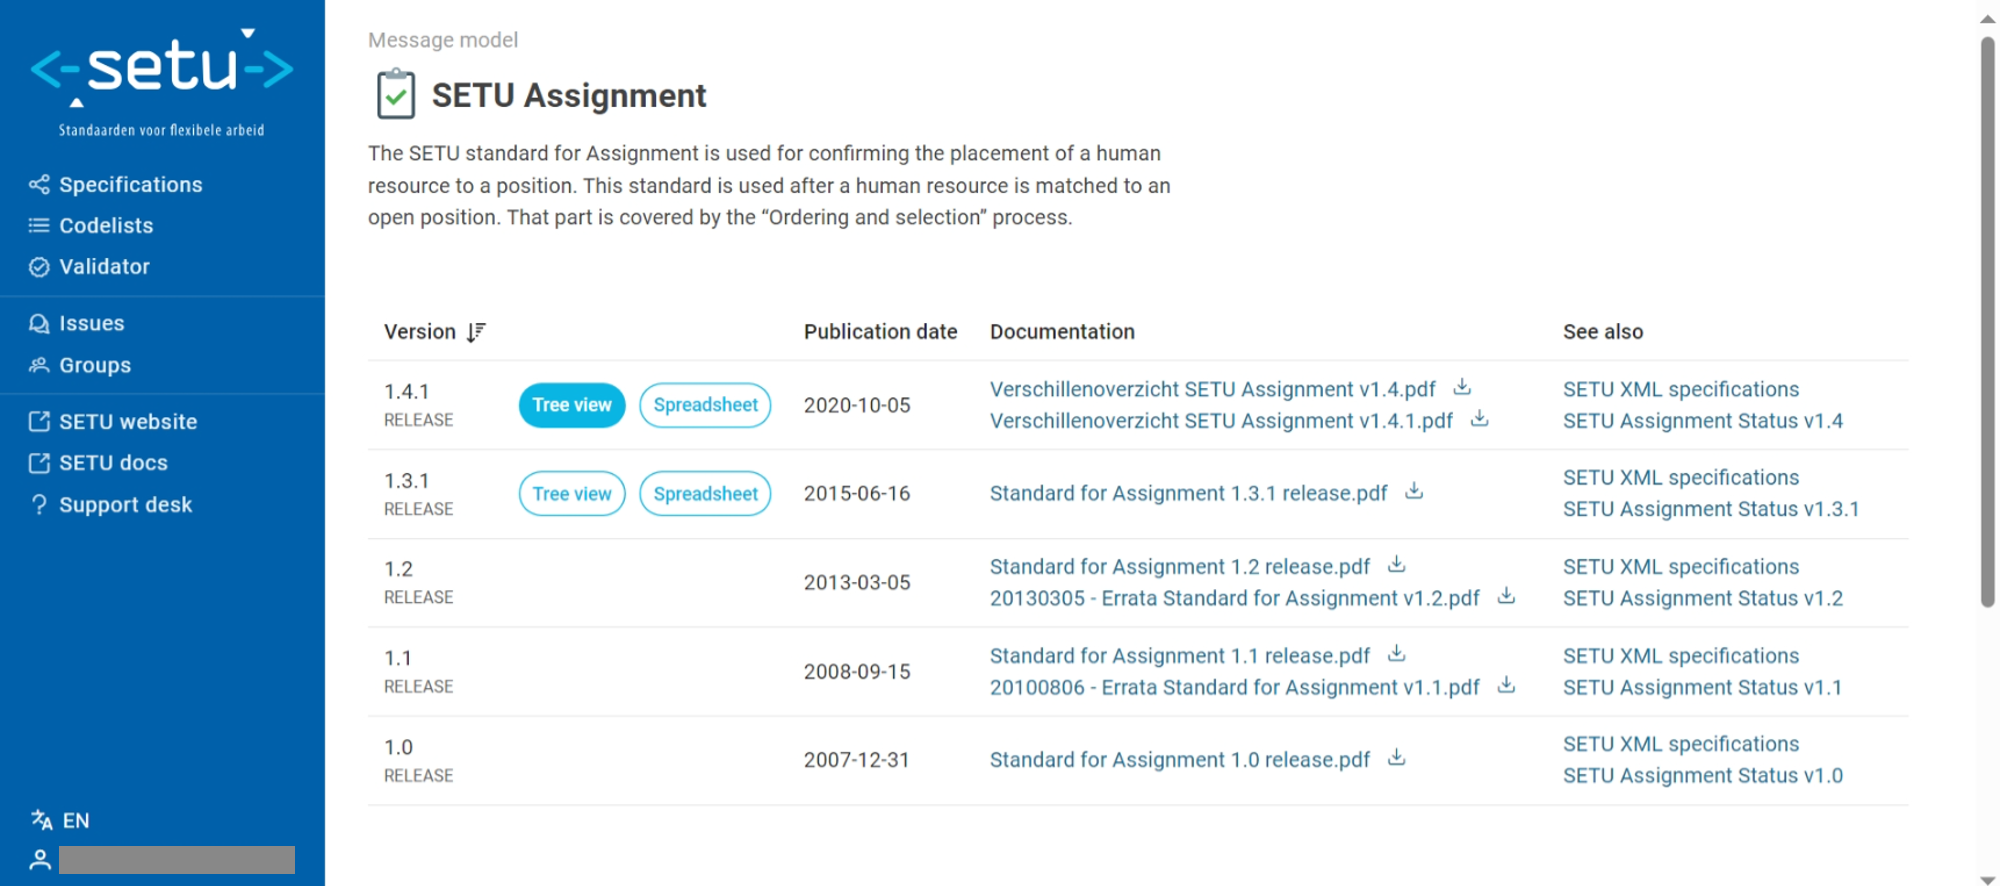
A message model provides an overview containing:
- The name of the specification with a corresponding icon.
- A description of the scope of the message model and the processes it covers.
- Different versions of the message model. Each version specifies:
- The version identifier, with the newest version of the message model shown on top.
- The status of the message model underneath, e.g. RELEASE, DRAFT, etc. If a message version is deprecated, this version is shown visually less prominent.
- The 'Tree view' button to navigate to the tree view of the message model. Here you will find the entire specification of the message model version, presented in a so-called tree view.
- The 'Spreadsheet' button to directly download the message version as Excel spreadsheet (.xlsx).
- The original publication date of the version's x- and/or y-release.
- Documentation belonging to that specific version, e.g. the standard in PDF-format, changelogs, etc.
- References to related specifications.

At the bottom of the page, there are three additional information tabs:
- Validation showing a direct validation link together with the validation syntaxes and files for all message versions for which validation is available. Validation files can be downloaded.
- Release notes containing the changes made in comparison to previous versions.
- Acknowledgements to the authors of the message model.
View a message model in the tree view
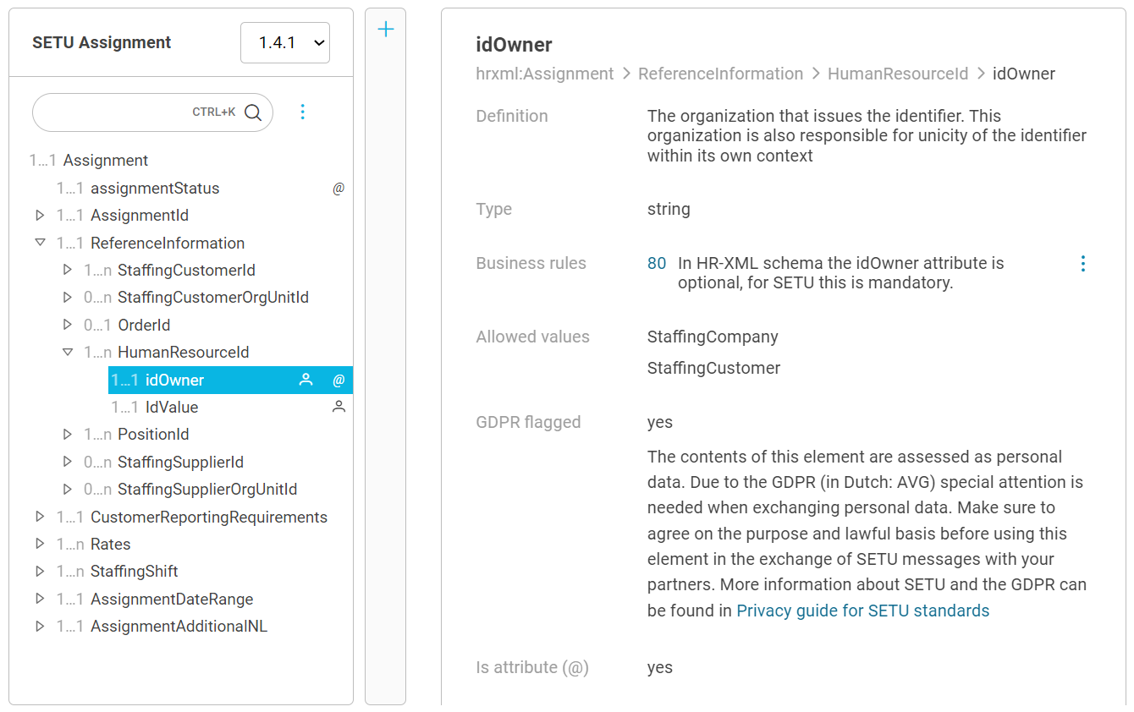
The tree view representation of a message model is split up in two main panels:
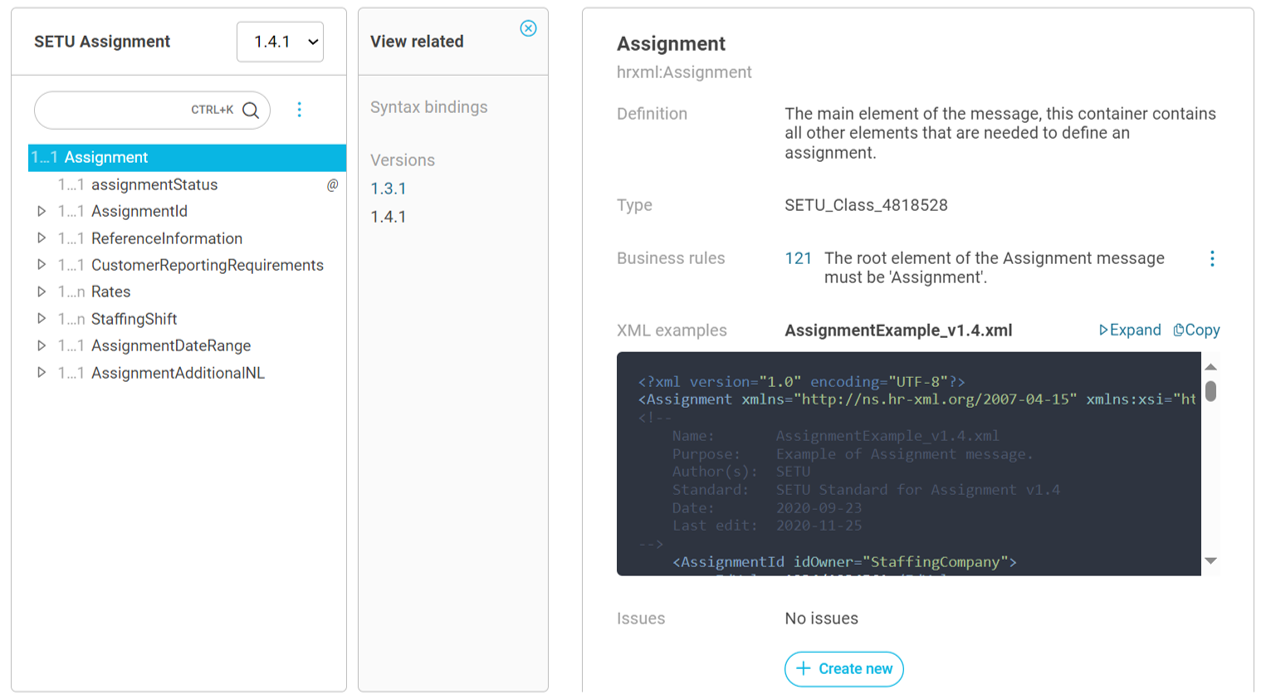
- The left panel shows the hierarchy of the message model, the so-called message tree. By default, the root node is selected, in this case
Assignment, and is highlighted in blue. All first sub (or child) elements are shown underneath. An element can be selected by clicking on it (it then becomes blue). This also means all sub elements of the selected element are expanded and shown underneath. This can also be done by clicking the arrow near an element. - The right panel shows information on the data element that is selected in the left panel. This includes:
- The name of the element.
- The syntax path made up of all parent elements, ending with the element itself.
- The definition of the element.
- The type of the element.
- Codelists that apply to the element.
- Usage notes applying to the element, providing additional clarification on its usage or certain scenario's.
- Business rules that apply to the element.
- Allowed values that an element is allowed to have.
- Restriction notes, specifying a specific datatype or format the filled-in value should comply to, e.g. date notation according to YYYY-MM-DD.
- GDPR flag if the contents of this element are assessed as personal data.
- Attribute tag if the element is an attribute.
- Example code snippet of the selected (container) element. Users can expand and copy examples. Examples can be expressed in different syntaxes, e.g. XML and JSON. This example shows an entire XML example message including the title of the file (AssignmentExample_v1.4.xml), but each element can also have an example snippet covering a smaller scope.
- Issues, showing all issues related to this data element and a button to create a new issue for this specific element.
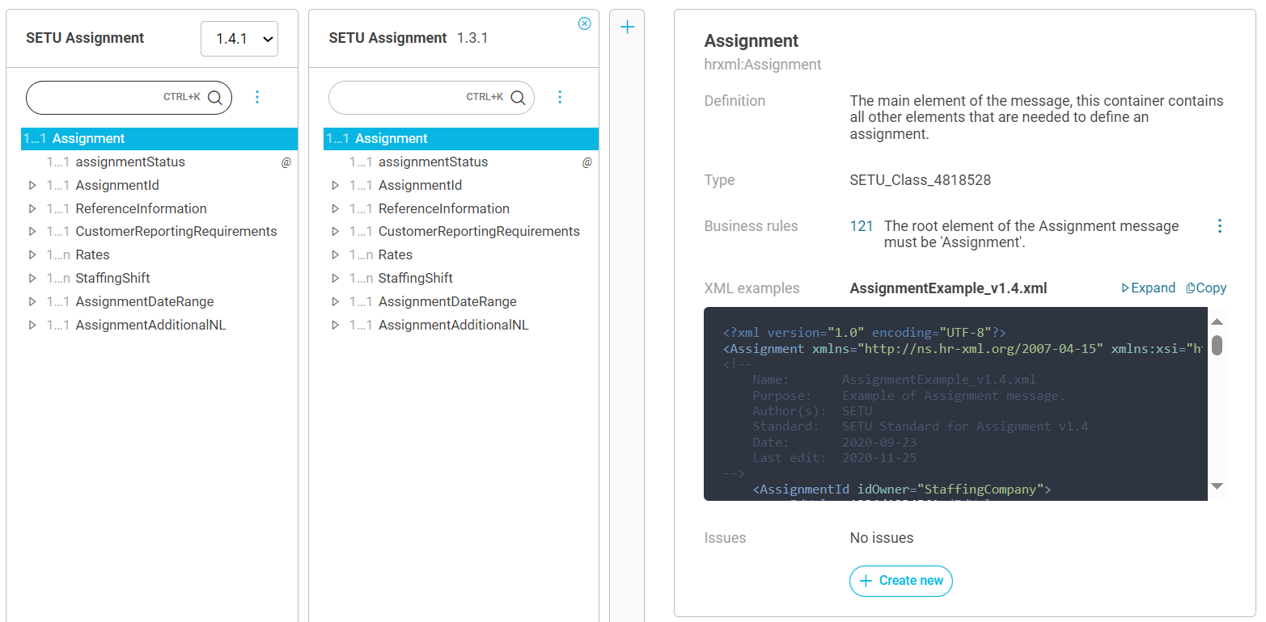
- In the middle grey panel users can select related message versions or syntax bindings. When the user selects one of these, another second tree is added right next to the left tree showing this other version or syntax binding, as shown in the screenshot below.
Below another example showing idOwner as selected element on the left panel with its semantic information on the right panel. Here you also see an example of an element in the tree having two icons. Attribute elements are indicated by a @ icon and the person icon is used as GDPR flag.
Switch between versions of a message model
When multiple versions of a message model are available as tree view, it is possible to toggle between the versions. When using the dropdown at the top of the left tree panel, you can switch versions for the entire message.

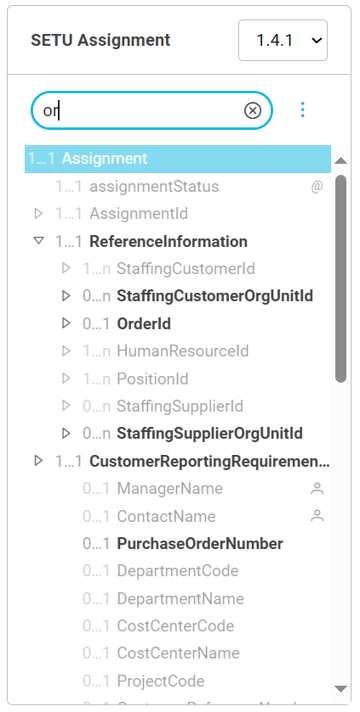
Search element in message tree
The search bar at the top of the tree panel can be used to search for elements within the message tree. The search bar can be used by clicking on it or by using CTRL + K while in the browser. While typing, real-time search suggestions are highlighted in the tree based on the search query, as shown in the screenshot below.
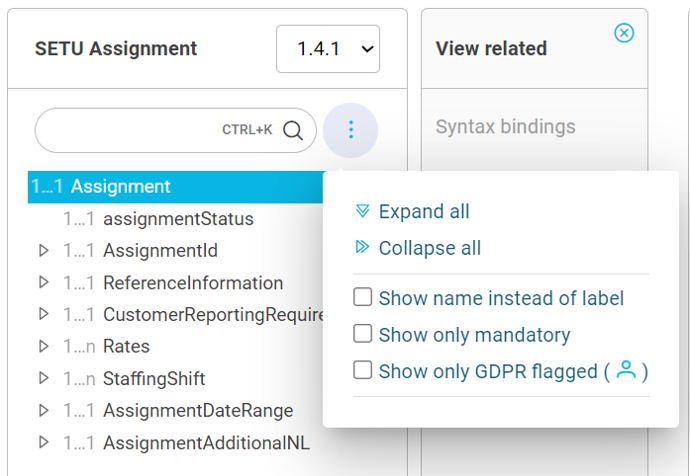
Filtering options
Next to the search bar in the tree panel there is a menu with filtering options. In this menu users can:
- Expand or collapse all elements in the tree view at once.
- Switch on a filter to show element names instead of element labels. For some message models this will allow to switch between the formal names of element names (written apart, e.g.
scheme agency id) and the CamelCase label names as used in underlying models (e.g.schemeAgencyId). - Switch on a filter to show only mandatory elements (with cardinality of at least 1).
- Switch on a filter to only show elements that are GDPR flagged.
View an ontology
Users can access an ontology model in three different ways:
- Visualize with Graph view. The visualization offered by the WebVOWL tool allows users to see the ontology as a graph, and offers filtering and search functionalities to reduce the overwhelming effect some large ontologies can have.
- View the ontology in the tree view. With this functionality users can select a starting class from the ontology and then all properties of this class are shown in the tree. Users can use this functionality to explore the content of the ontology.
- Download/export the ontology in any RDF serialization. Turtle is the default format.
